Home      About Me      Contact      My Family       Travels       The Kitchen       The Bar

Tuesday, June 8, 2010

Wallpaper Art


A friend of a friend sent me an email today and asked if I would be willing to teach her some crafts to fix up her house.  She hasn't done a lot of crafts before and isn't really sure where to start.  Well, she shouldn't start with me.  I'm not exactly known for my crafting skills. 

But, I do follow directions pretty well.  Case in point, this new art project that I copied straight from Sarah at Thrifty Decor Chick.

I really loved Sarah's - like most projects she shares with her THOUSANDS of readers, she has created the project on her own so that people like me can unashamedly!

I had this space that I felt like needed a fix.  I really like this print and it's been hanging in this spot in our bedroom for 5 1/2 years, but I've always known it was too small for the space (above the tv/fireplace).  It also doesn't exactly "go" because of the gold frame, but I wasn't in a hurry to replace it until I had an idea of what to do.  Then I thought of Sarah's inexpensive project and thought I'd try it out.

I love the print though.  I bought it when my mom and I were in Edinburgh, Scotland several years ago.

Following Sarah's tutorial, I assembled all of my tools and got started.  I bought 3 canvases at Hobby Lobby - all on sale, ending up being about $4 each.  I actually bought about 10 of different sizes and shapes so I could bring them home and see what worked best and return what didn't.  I ended up using 16x20 sized ones.


Then I took textured, paintable wallpaper and cut sizes to fit around the canvases.  Finding the wallpaper was tough.  None of my local stores had it with a print like I was looking for.  I ended up ordering it from Target online and I have a BUNCH leftover so if you want any, please let me know!

While Sarah actually pasted the wallpaper onto her canvases, I chose not to and just began stapling them on.  I did this because I did not have wallpaper paste and didn't want to go back to Lowe's!  (The last time I hung wallpaper it called for water not paste so it didn't occur to me to pick up paste).  I justified just stapling it on by telling myself that this would be easier to remove if I decided to change it up.  It would be tough to take pasted-on wallpaper off the canvases.

I found David's heavy duty stapler in the garage (I forgot to mention he was out of town during this little project) and got to work.  I quickly learned 8 year olds shouldn't be helpers during this phase of the project.  I was sure one of us was going to end up with a heavy duty staple somewhere in our body.

I pulled the wallpaper tight and it was pretty easy to get these done in 15 minutes.


I realized pretty quickly that my leaf design was much larger than Sarah's or Stef's at Frugal Home Ideas.  I started wondering how it was going to look after I painted the canvases and then started highlighting the LARGE leaves with metallic glaze. 


The boys had friends over so we all headed out to the pool where I set up the canvases and began painting.  Very simple to get a couple of coats of terra cotta (actually Valspar Black Cherry) that I wanted for our room.

And then I added glaze as Stef mentioned in her blog post, and this is where I stopped.  Too metallic-y.  Did I even like this?  Should I find better textured wallpaper and start over?  Was this really even going to work in our room?  Would David like it at all?  I let them sit for a few days while I stewed on it.


And the more I looked at them lying on the floor, the more I liked them.  David liked the concept too, so I covered the glaze with another coat of Black Cherry and we got to hanging.


There isn't any light directly overhead so it's a bit deceiving in the color in this photo. I think the size works well for the space and depending on the sunlight, they can look very dark or very light, which is kind of cool.


The leaves are too large to highlight in the glaze I decided, so I'm just letting the glaze underneath come through here and there.  As David pointed out, the texture is obvious enough that it gives it some interest without highlighting it.  I'm going with that reasoning.

I don't know if we'll keep them here forever, but I enjoyed this project, like the concept of using textured wallpaper for art, and am enjoying them for now.

And the print we liked so much?  We're trying it out in another spot that needed a little something.  That's the good thing about art - it's not permanent!


Monday, June 7, 2010

Photo Art


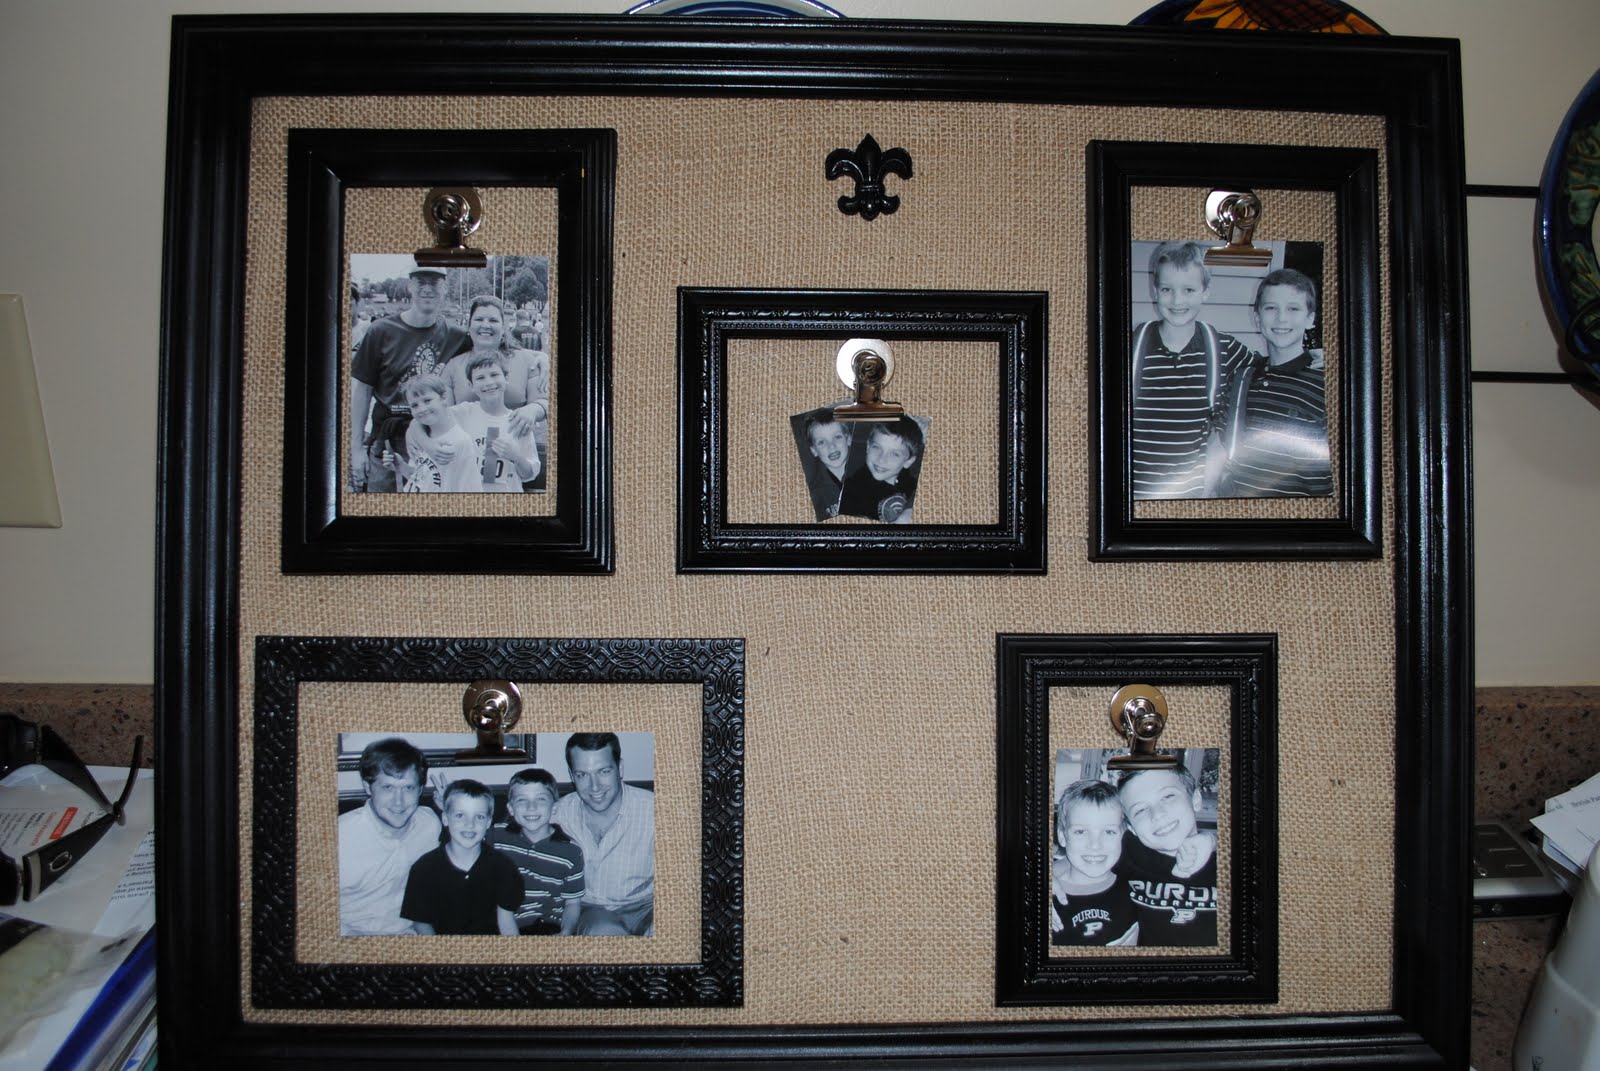
I saw this really cute photo art project at the Shanty 2 Chic sisters website back at Christmas and I was excited to try it out.

I followed their directions pretty much to a T, but I'll show you below how I put this together.  I took this large picture from Goodwill ($5) and discarded all but the cardboard backing and the frame.  It's hard to see in this dark picture but the frame was a dark green.


I then gathered a collection of Dollar Store frames and placed them the way I thought they'd work.  I also got a fleur de lis applique from Hobby Lobby for $.40.  I sprayed painted the frames and the applique with Rustoleum Canyon Black.  That was really fun.  I haven't spray painted much before, but I'm already looking around for what else I can spray!


I took a $1 piece of burlap and covered the cardboard.  I sprayed Elmers adhesive down and laid the burlap on top of it.


Then I flipped it over and trimmed the edges and hot glued them down.  Then I placed the burlap-covered carboard back in the frame.

I found these magnetic clips at Walmart (4 for $2) and hot glued them and the black frames onto the burlap.


Along with the fleur de lis.


Then turned some old photos black and white, cut them to fit and clipped them in.


I think it turned out really cute.  Here it is hanging on the wall along the stairs.  I like the coloring and that you can change out the pictures really easily by just clipping them in. 

The total cost was about $11 for the frames, applique, clips, burlap and printing off the pictures at Target.

If I were to do another one I would start with a larger frame and then use 8x10s as well as 5x7s for the interior frames.  But this was the largest frame Goodwill had when we went and I think it worked out pretty well.

Saturday, June 5, 2010

101 Places to See Before You're 12 - A Medical Museum


A Medical Museum

It was an overcast Saturday and we all needed a break from the sun having been out by the water the last 3 days.  So we decided to take a little trip to one of our 101 Places.  The boys and their friend Nathan chose the Indiana Medical History Museum.

Definitely one of the more macabre visits on the list, and Brennan was TOTALLY in his element!  He absolutely loved it and amazed me with his knowledge of chemistry, anatomy, and 19th century medical practices thanks to this book:
(This "You Wouldn't Want to Be" series is really great by the way).


The IMHM is definitely worth a visit.  I was surprised by how many people were there and how each group that showed up got their own tour guide!  Our guide was great.  He said that Brennan reminded him so much of himself at 8.

The museum is in the old pathology building (1896) on the grounds of the former Hospital for the Insane.  This is one of the only buildings that remain.  The doctors who built the hospital in the mid-to-late 1800s were pioneers in the moral care concept.  They felt that it was inhumane to treat those with mental disabilities and diseases as prisoners. 

Brennan asked dozens of questions.  He loved seeing all the original equipment and medicines.  The older boys - not so much.

In one of the labs - original equipment everywhere you look.

This is the autopsy room - Brennan had TONS of questions for our guide.  Thomas was ready to get the heck out.

Thomas got involved here because he knew what an iron lung was (how, I don't know!)

The histology laboratories (studies of cells) intrigued all the boys.  Here we're looking at different cuts of cells.  Again, Brennan could teach a course on this stuff.

Looking through an 1800s microscope at an 1800s cell slide.

This was also a medical school.  Here is where the students took all of their classes and watched autopsies.

You may recognize the Pearl Jam CD "Vitalogy".  It's next to the medical text book its cover art was taken from. 

Don't look too closely here.  These are two walls full of cross-sections of human brains.  You'll see Brennan smiling - he loved this and could have spent hours here analyzing the differences.  Thomas wouldn't even look and again, was ready to get the heck out.

The hospital had a thriving herb garden to make remedies and medicines.  This was Thomas's favorite part.  Until he realized his back in this picture is next to the famous "dead house" that our tour guide mentioned while on our tour.  Then he was ready to get back in the car.

But Brennan asked for his picture next to the Dead House.  This is where bodies came before going to the autopsy room next door.

I promised Thomas the next 101 Place would involve something a lot less creepy!


From the Book:
#87 - A Medical Museum

You may not always like the taste of the medicine you're given, but consider the alternative:  if you'd been born 100 years ago, you might have been given leeches.  Not to eat, of course, just to suck your blood to remove the impurities from it.  Through the years, medical researchers have made a lot of discoveries that make it easier for us to stay healthy, but they had to try a lot of wacky ideas before getting it just right.  Visit a medical museum to learn about what used to happen when someone got sick.  You'll see jars full of old herbal medicines, old medical instruments, and maybe even some bottles with dead or live leeches.  In some of the creepier exhibits, you'll see human skulls and skeletons, or actual human organs preserved in fluid.  You'll never complain about having to go to your doctor's office again.


Wednesday, June 2, 2010

Summer's Here!


School's Out!  We now have a 5th grader and a 3rd grader - I can't believe it!  74 Days of Summer - yeah!!!

It has been quite the year, especially for Thomas.  We all made it through in one piece.  The Accelerated program was exactly what he needed - a true challenge for him finally.  But, boy, did it challenge us :)

In other Thomas news, he lost a tooth last weekend and when I went to the end-of-school class party today, he had lost another tooth!  It was really sweet - he came up to me and hugged me and showed me his tooth box around his neck.  How much longer will I get hugs from my boys in FRONT OF THEIR FRIENDS?  Not long, I'm sure.


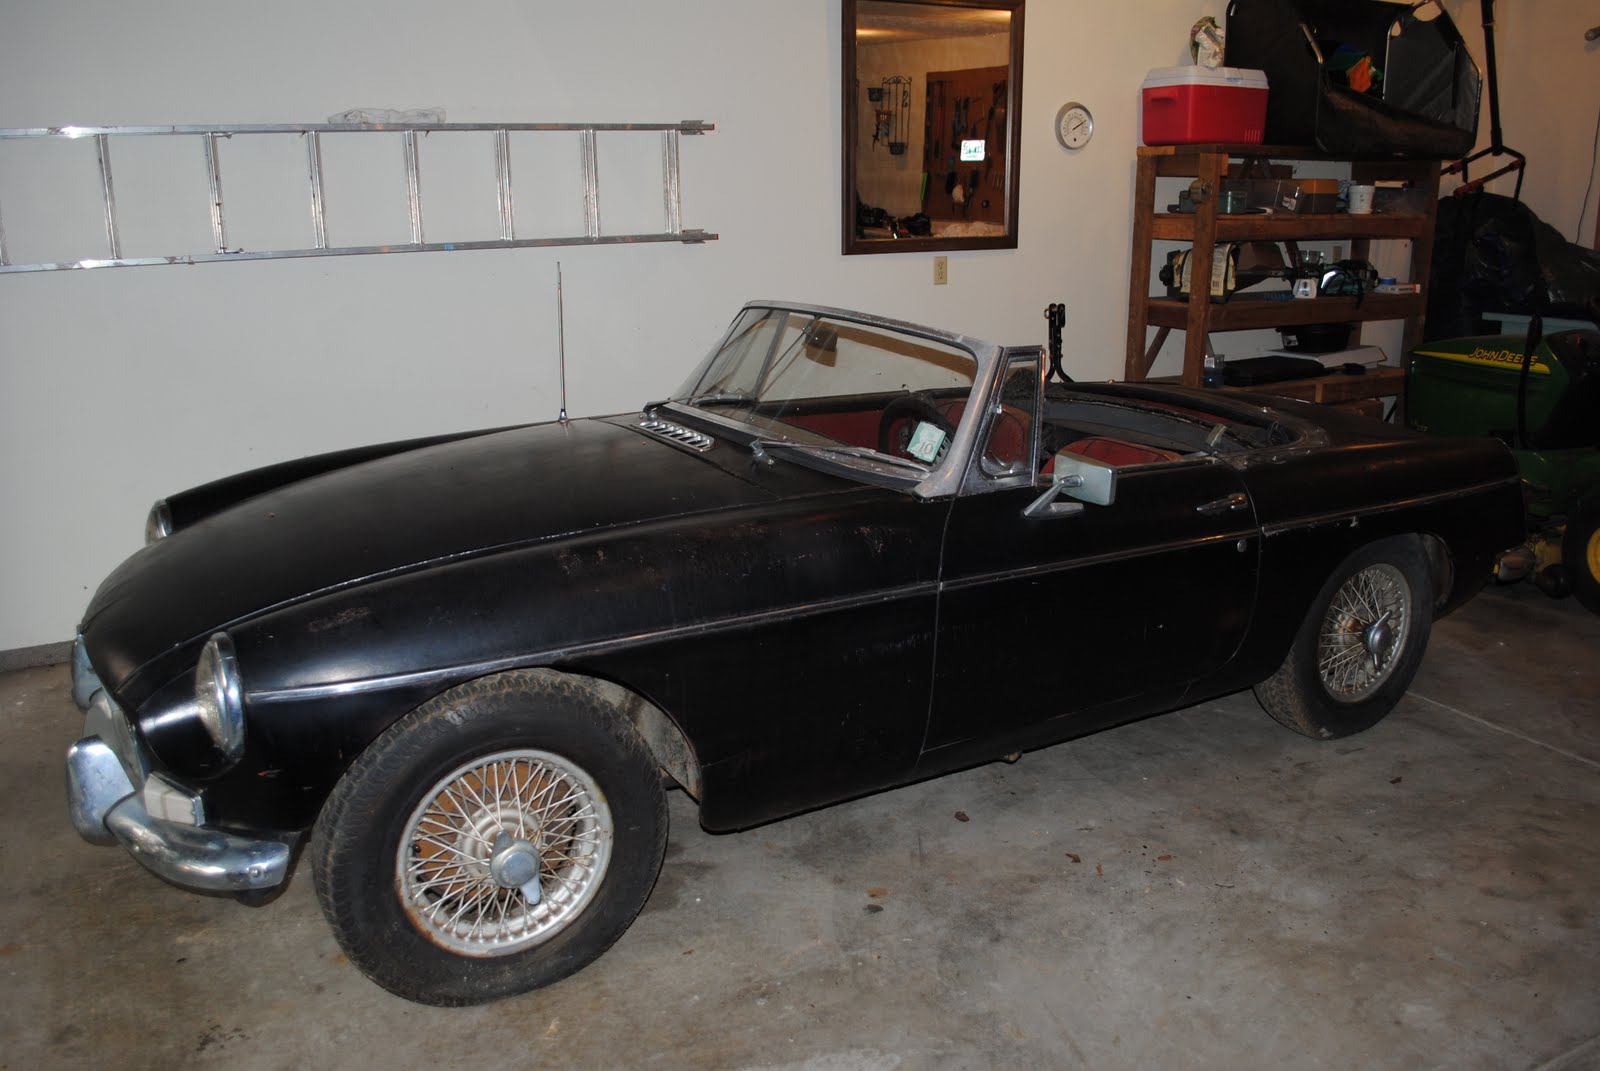
In MG news:

David and the boys cleaned it well.  David replaced the battery and now the horn and lights work and the radio comes on! 

Next up - working on the starting system and fuel system.  David's really enjoying this new hobby!

Tuesday, June 1, 2010

Happy Birthday Mamaw!


Happy 87th Birthday, Mamaw!

We Love You!

Memorial Day 2010


We had a wonderful Memorial Day with friends.  We went out on the pontoon boat around the lake, fishing and swimming.  It was really nice to be out on the water.  The kids had so much fun!


Brennan in his element - any kind of water!