A friend of a friend sent me an email today and asked if I would be willing to teach her some crafts to fix up her house. She hasn't done a lot of crafts before and isn't really sure where to start. Well, she shouldn't start with me. I'm not exactly known for my crafting skills.
But, I do follow directions pretty well. Case in point, this new art project that I copied straight from Sarah at Thrifty Decor Chick.

I really loved Sarah's - like most projects she shares with her THOUSANDS of readers, she has created the project on her own so that people like me can unashamedly!
I had this space that I felt like needed a fix. I really like this print and it's been hanging in this spot in our bedroom for 5 1/2 years, but I've always known it was too small for the space (above the tv/fireplace). It also doesn't exactly "go" because of the gold frame, but I wasn't in a hurry to replace it until I had an idea of what to do. Then I thought of Sarah's inexpensive project and thought I'd try it out.
I love the print though. I bought it when my mom and I were in Edinburgh, Scotland several years ago.
Following Sarah's tutorial, I assembled all of my tools and got started. I bought 3 canvases at Hobby Lobby - all on sale, ending up being about $4 each. I actually bought about 10 of different sizes and shapes so I could bring them home and see what worked best and return what didn't. I ended up using 16x20 sized ones.
Then I took textured, paintable wallpaper and cut sizes to fit around the canvases. Finding the wallpaper was tough. None of my local stores had it with a print like I was looking for. I ended up ordering it from Target online and I have a BUNCH leftover so if you want any, please let me know!
While Sarah actually pasted the wallpaper onto her canvases, I chose not to and just began stapling them on. I did this because I did not have wallpaper paste and didn't want to go back to Lowe's! (The last time I hung wallpaper it called for water not paste so it didn't occur to me to pick up paste). I justified just stapling it on by telling myself that this would be easier to remove if I decided to change it up. It would be tough to take pasted-on wallpaper off the canvases.
I found David's heavy duty stapler in the garage (I forgot to mention he was out of town during this little project) and got to work. I quickly learned 8 year olds shouldn't be helpers during this phase of the project. I was sure one of us was going to end up with a heavy duty staple somewhere in our body.
I pulled the wallpaper tight and it was pretty easy to get these done in 15 minutes.
I realized pretty quickly that my leaf design was much larger than Sarah's or Stef's at Frugal Home Ideas. I started wondering how it was going to look after I painted the canvases and then started highlighting the LARGE leaves with metallic glaze.
The boys had friends over so we all headed out to the pool where I set up the canvases and began painting. Very simple to get a couple of coats of terra cotta (actually Valspar Black Cherry) that I wanted for our room.
And then I added glaze as Stef mentioned in her blog post, and this is where I stopped. Too metallic-y. Did I even like this? Should I find better textured wallpaper and start over? Was this really even going to work in our room? Would David like it at all? I let them sit for a few days while I stewed on it.
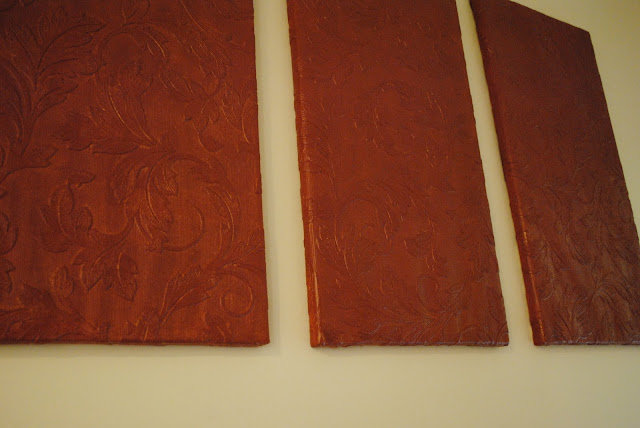
And the more I looked at them lying on the floor, the more I liked them. David liked the concept too, so I covered the glaze with another coat of Black Cherry and we got to hanging.
There isn't any light directly overhead so it's a bit deceiving in the color in this photo. I think the size works well for the space and depending on the sunlight, they can look very dark or very light, which is kind of cool.
The leaves are too large to highlight in the glaze I decided, so I'm just letting the glaze underneath come through here and there. As David pointed out, the texture is obvious enough that it gives it some interest without highlighting it. I'm going with that reasoning.
I don't know if we'll keep them here forever, but I enjoyed this project, like the concept of using textured wallpaper for art, and am enjoying them for now.
And the print we liked so much? We're trying it out in another spot that needed a little something. That's the good thing about art - it's not permanent!






3 comments:
Another cool idea. Aren't you crafty lately!? :=) It looks great!
I love how that turned out. You read the same blogs that I do, we are probably more similiar than we realize!
Those turned out beautifully. And I love TDC too.
Post a Comment